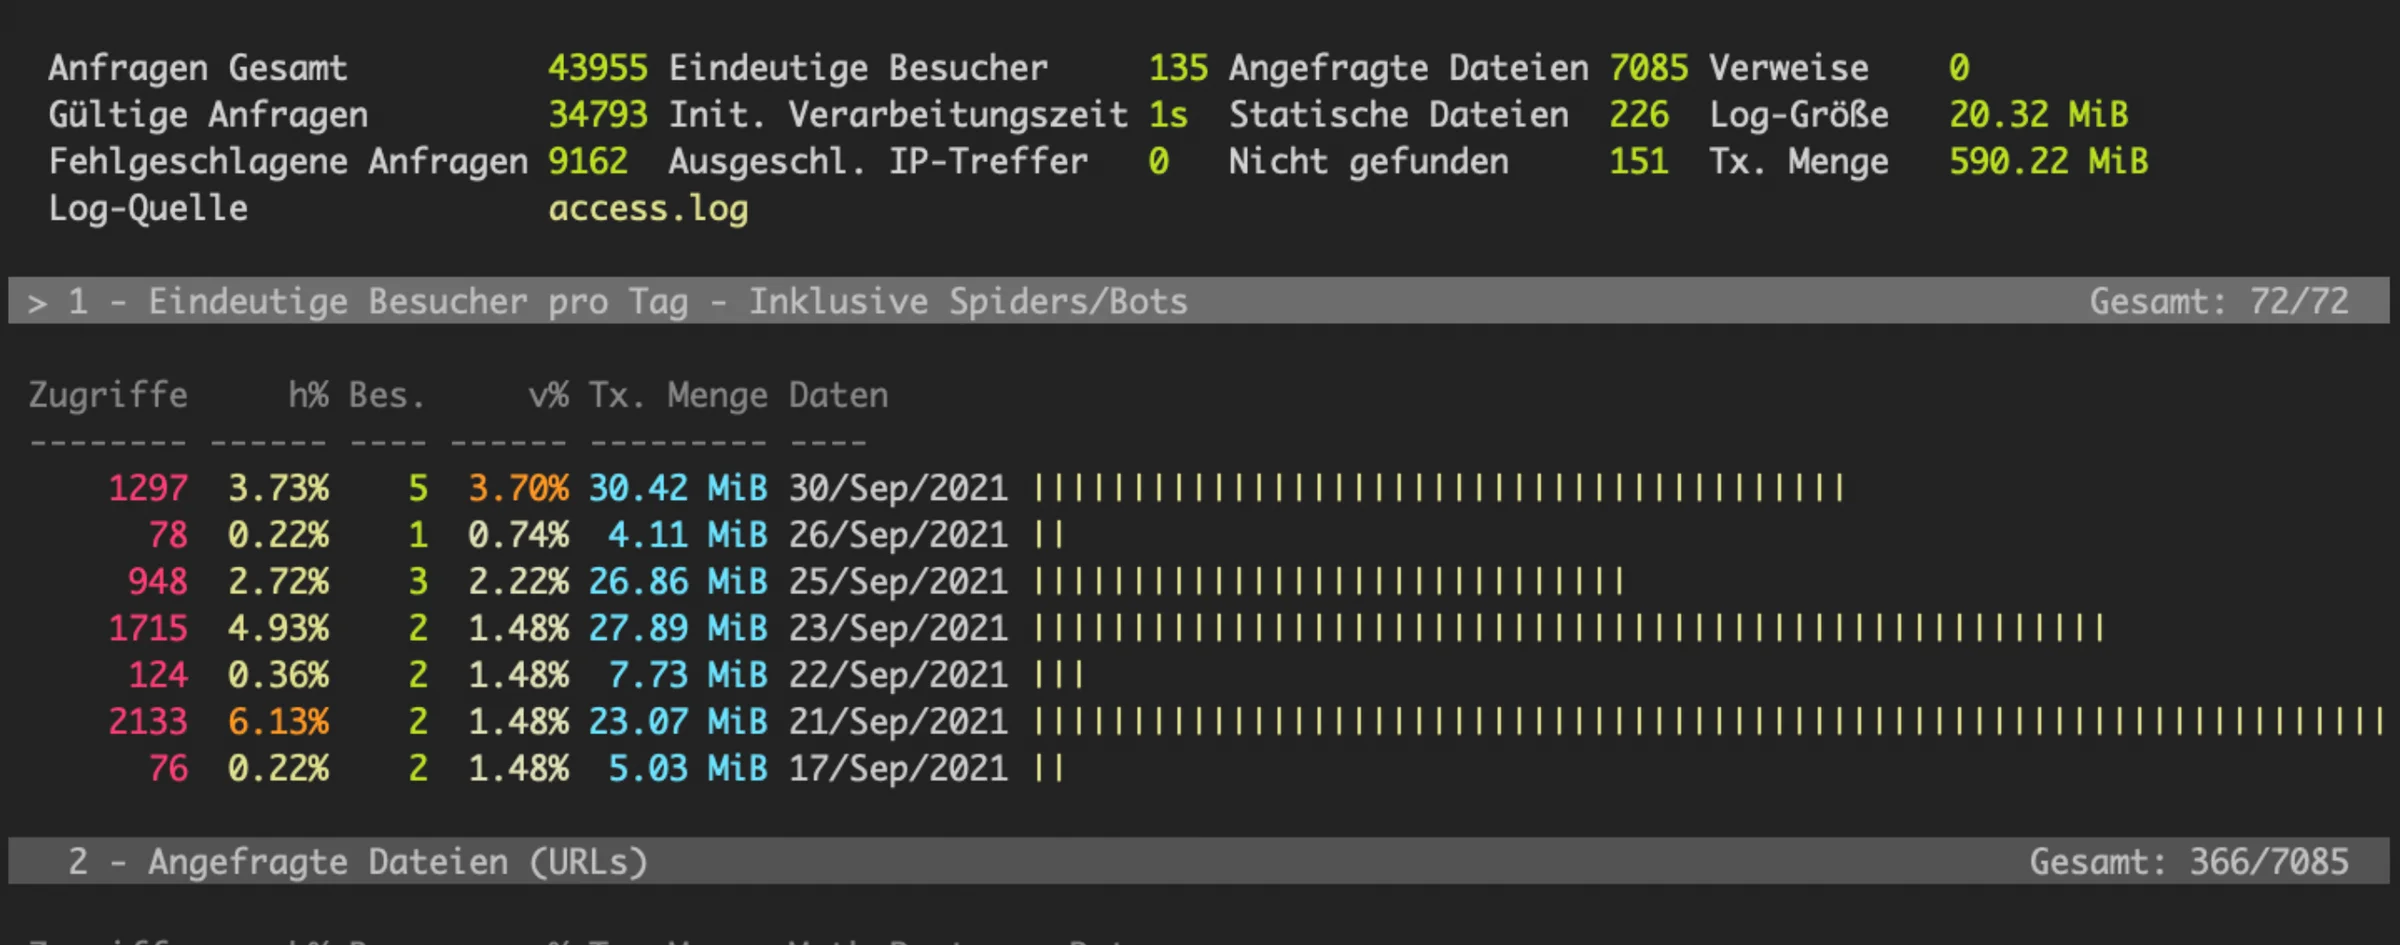
Your server's access.log file is a crucial component for maintaining the health and performance of your website. This log file records every request made to your web server, providing valuable information that can help you identify and mitigate potential threats. In this article, we'll explore how to use access.log to detect and block malicious bots that can cause high CPU usage, database crashes, and other performance issues.
Why Monitoring access.log is Essential
Before you consider upgrading your server or optimizing your database, it's important to check for signs of malicious activity. Bots and scrapers can aggressively crawl your site, leading to excessive server load and even downtime. Identifying these culprits through your access.log can save you time and resources by allowing you to address the root cause of the problem directly.
Common Issues Caused by Malicious Bots
- High CPU Usage: Bots can send numerous requests in a short period, overwhelming your server's CPU.
- Database Crashes: Continuous requests can overload your database, causing it to crash and leading to website downtime.
- Increased Bandwidth Consumption: Malicious bots can significantly increase your bandwidth usage, potentially leading to higher costs.
How to Analyze access.log
Viewing the access.log File
To start, you need to access your access.log file. On a typical NGINX server, you can find it at /var/log/nginx/access.log. Use the following command to view the log file:
sudo tail -f /var/log/nginx/access.logUnderstanding Log Entries
Each entry in the access.log file follows a specific structure. Here’s an example entry:
172.xx.xx.xx - - "GET /computer/device/memory HTTP/2.0" 200 41629 "-" "Mozilla/5.0 AppleWebKit/537.36 (KHTML, like Gecko; compatible; bingbot/2.0; +http://www.bing.com/bingbot.htm) Chrome/116.xx Safari/537.36" "52.xx.xx.xx,xx.xx.xx.xx"Here's a breakdown of the key components:
- IP Address: The IP address of the requester.
- Timestamp: The date and time of the request.
- Request Method and URL: The HTTP method (e.g., GET) and the requested URL.
- Response Code and Size: The HTTP response code (e.g., 200 for success) and the size of the response.
- User-Agent: Information about the requester’s browser or bot.
Identifying Malicious Bots
Look for patterns in the access.log that indicate malicious behavior. For example:
- A high number of requests from a single IP address or User-Agent in a short period.
- Requests to non-existent URLs or repetitive access to certain pages.
Example: Detecting Aggressive Scraping
In my case I notice multiple entries from claudebot these, indicating aggressive scraping:
172.xx.xx.xxx - - "GET /product-page HTTP/2.0" 200 12345 "-" "ClaudeBot/1.0 (+http://www.claudebot.com)"Blocking Malicious Bots Using Fail2Ban
Step 1: Install Fail2Ban
First, install Fail2Ban if it’s not already installed:
sudo apt-get update
sudo apt-get install fail2ban
Step 2: Create a Fail2Ban Filter
Create a filter file to match the malicious User-Agent. For instance, to block "ClaudeBot":
sudo nano /etc/fail2ban/filter.d/bad-bots.confAdd the following content to the file:
failregex = <HOST>.*"GET.*HTTP.*".*"ClaudeBot/1.0.*Step 3: Configure the Jail
Now, create a jail configuration to use this filter:
sudo nano /etc/fail2ban/jail.localAdd the following content:
enabled = true
filter = bad-bots
action = iptables-multiport
logpath = /var/log/nginx/access.log
bantime = 86400
findtime = 600
maxretry = 5
Step 4: Restart Fail2Ban
Finally, restart Fail2Ban to apply the changes:
sudo systemctl restart fail2banMonitoring and Maintaining Fail2Ban
Checking Banned IPs
To see the list of banned IPs, use:
sudo fail2ban-client status nginx-bad-botsUnbanning an IP
If you need to unban an IP, use:
sudo fail2ban-client set nginx-bad-bots unbanip <IP_ADDRESS>Conclusion
Regularly monitoring your access.log and using tools like Fail2Ban can help you protect your server from malicious bots. By identifying and blocking these threats, you can ensure the stability and performance of your website, avoiding unnecessary server upgrades or database optimizations.
You might also like
View all
Comments (0)
No comments yet. Be the first to comment!